
🌿 Non-Toxic Cleaning Protocols
📅 Updated for 2026
How to Clean and Descale a Baby Bottle Warmer – You rely on your bottle warmer multiple times a day (and night) to soothe your hungry, crying baby. It is one of the hardest-working appliances in your kitchen. But have you looked closely at the inside of the heating chamber lately?
If you see a chalky white crust coating the bottom metal plate, or if you notice a murky, slimy film along the plastic edges, your machine is crying out for an intervention. These uninvited guests are known as limescale and mold.
Many exhausted parents simply ignore the crust, assuming it is harmless. However, neglecting appliance maintenance can lead to a burnt-out motor, a foul-smelling kitchen, and, worst of all, a massive bacteria hazard right next to your baby’s food.
Learning exactly how to clean a bottle warmer does not require expensive, toxic chemical cleaners. In fact, using standard household chemicals is highly dangerous for infant gear.
Let’s break down the science of why your warmer gets so dirty, the ultimate natural descaling protocol, and the daily habits that will keep your machine looking brand new for years.
The Science of Scale: Why Does Your Warmer Turn White?
Before we clean the machine, you need to understand what you are fighting. That stubborn white crust is not dried breast milk or formula powder. It is a buildup of calcium and magnesium.
If you use regular tap water in your bottle warmer, you are introducing microscopic dissolved minerals into the heating chamber. When the warmer boils the water to create steam or a warm bath, the pure H2O evaporates into the air. However, the heavy minerals do not evaporate.
They are left behind, baking onto the metal heating element layer by layer. Over time, this creates a thick, rock-hard barrier known as limescale.
⚠️ The Hidden Dangers of Limescale
- It Breaks the Machine: Limescale is a fantastic insulator. It traps the heat against the metal plate, forcing the machine to work twice as hard to warm the water. Eventually, this trapped heat will short-circuit the internal thermostat and permanently kill the motor.
- It Harbors Bacteria: While the minerals themselves are not toxic, the rough, porous surface of the limescale acts like a sponge for mold spores and bacteria, making it impossible to wipe the machine clean.
- It Causes Burning Smells: As the crust gets thicker, the bottom layers closest to the heating element begin to scorch, filling your nursery with the smell of burning plastic and metal.
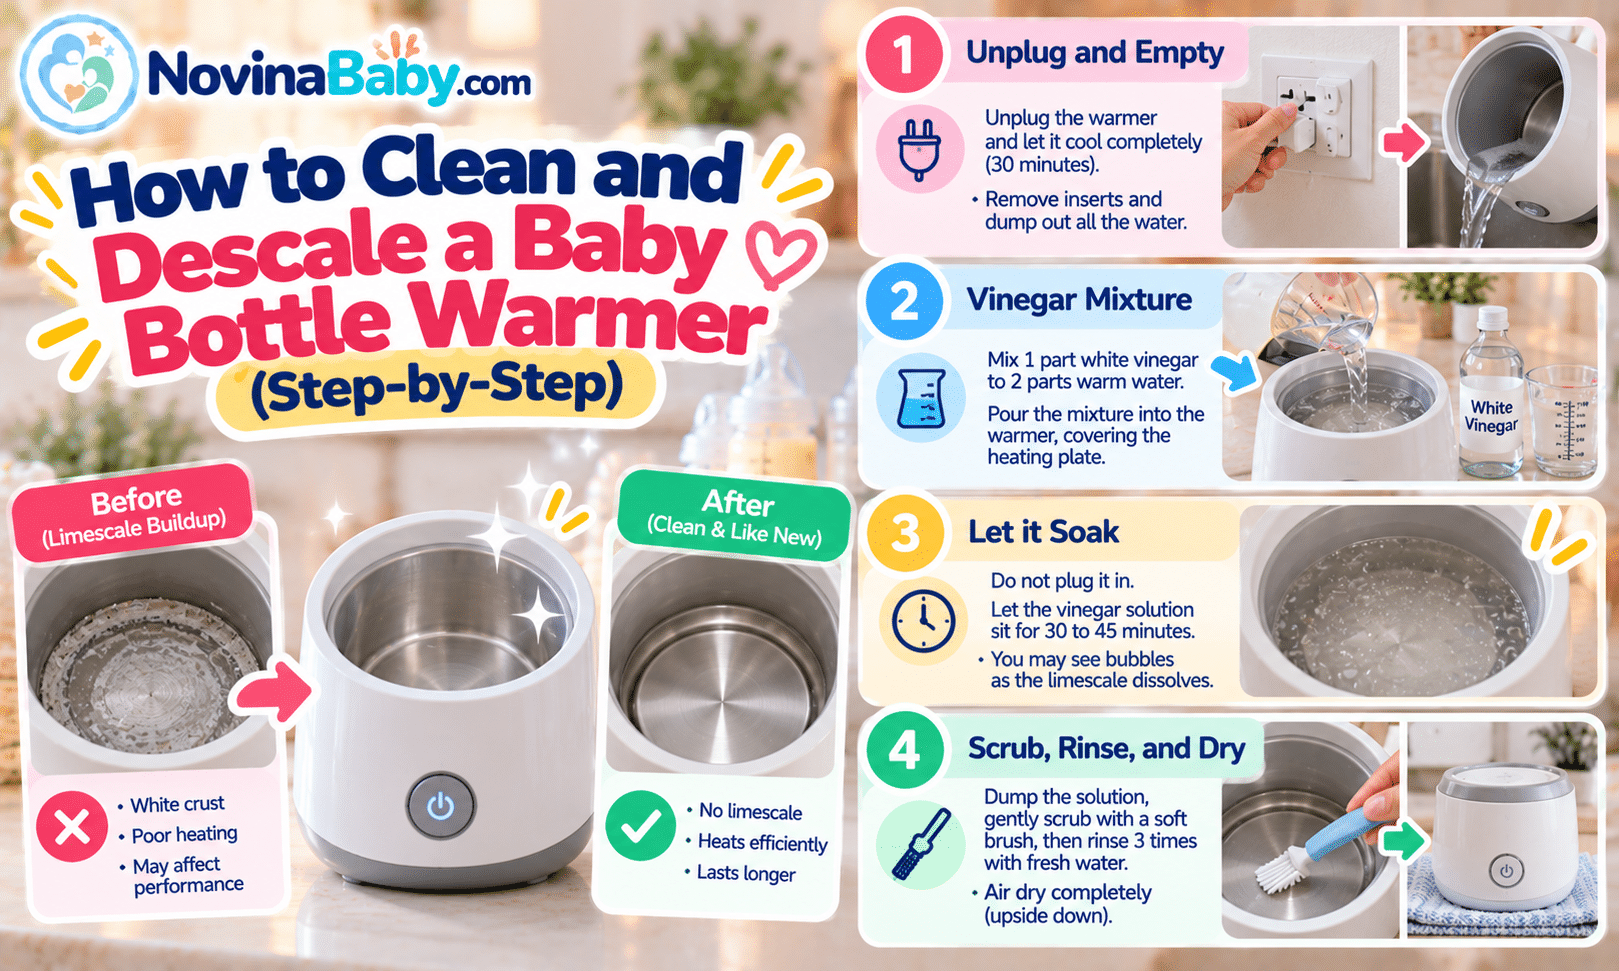
The Ultimate Descaling Protocol (Step-by-Step)
To safely remove limescale, you must use an acid to dissolve the alkaline minerals. Forget harsh chemical descalers sold at hardware stores. The safest, most effective tool is ordinary white distilled vinegar, which is standard practice for maintaining heated nursery appliances like sterilizers.
Follow this 4-step protocol every two to three weeks to keep your machine pristine.
How to Destroy Mold in Your Bottle Warmer
If you have been leaving standing water inside your warmer for days at a time, you are likely dealing with black spots or pink slime around the plastic rim. This is mold, and it thrives in warm, humid, dark environments.
Never use bleach to kill mold in baby appliances. Bleach leaves behind toxic chemical residues that can easily transfer to the outside of your baby’s bottle when you warm it.
🌿 The Baking Soda Method
Instead of bleach, create a thick paste using baking soda and warm water. Baking soda is a natural fungicide and a mild abrasive.
Take an old, clean toothbrush (or a dedicated baby detail brush) and scrub the baking soda paste directly into the moldy crevices and corners.
Let the paste sit for 15 minutes to kill the spores, then wipe it away with a damp cloth and rinse the machine thoroughly.
3 Pro Tips to Prevent Limescale and Mold Forever
Cleaning is exhausting. The secret to nursery gear is preventing the mess from happening in the first place. Implement these three daily habits to keep your bottle warmer pristine.
- The Golden Rule: Use Distilled Water. This is the ultimate hack. Distilled water has had 100% of its minerals removed during the purification process. If you only pour distilled water into your bottle warmer (or steam sterilizer), limescale is physically impossible to form. You will never have to descale it again.
- Empty It Every Night. Do not let water sit in the reservoir for 72 hours. Before you go to bed, dump the water out and leave the lid open so the interior can air dry overnight. No stagnant water means no mold.
- Don’t Let Milk Spill. When you are learning how to safely warm breast milk, always ensure the bottle cap is screwed on tightly before submerging it. If milk leaks into the warmer’s water bath, it will sour immediately and cause a putrid smell the next time the machine heats up.
How to Clean Baby Bottle Warmer (FAQ)
Can I use lemon juice instead of vinegar to descale?
Yes! If you hate the strong smell of white vinegar, you can substitute it with an equal amount of fresh lemon juice or a tablespoon of citric acid powder mixed with water. The natural citric acid breaks down limescale just as effectively and leaves a fresh scent behind.
Is it safe to put the bottle warmer in the dishwasher?
Absolutely not. The main body of a bottle warmer contains electrical wiring and a motor. Submerging it in water or placing it in a dishwasher will permanently destroy the machine and create a massive electrocution hazard. Only removable, non-electric plastic inserts can be washed in the sink.
Why does my bottle warmer still smell like vinegar after cleaning?
Vinegar has a very pungent odor that can linger on plastic. To neutralize the smell, simply fill the warmer with fresh water, run one standard heating cycle, and then dump the water out. Leave the lid open, and the smell will dissipate completely within a few hours.
Can limescale make my baby sick?
The calcium and magnesium that make up limescale are not directly toxic to humans. However, the rough, crusty surface of limescale is the perfect hiding spot for harmful bacteria and mold to grow, which can transfer to the outside of your baby’s bottle and make them sick. Keeping it clean is vital for hygiene.
Is Your Warmer Beyond Saving?
If the heating plate is permanently scorched or the motor is failing due to years of hard water damage, it might be time for a fresh start. We have rigorously tested the market to find the most durable, easy-to-clean devices that resist mineral buildup and make 2:00 AM feedings effortless.
Novina Baby may earn a commission when readers purchase qualifying products through affiliate links. Medical/Safety Note: The Centers for Disease Control and Prevention (CDC) warns that stagnant warm water is a primary breeding ground for dangerous bacteria and mold spores. Regularly cleaning and descaling your baby feeding appliances is essential to prevent these pathogens from transferring to your baby’s bottles and pacifiers.
Can I use lemon juice instead of vinegar to descale?
Yes! If you hate the strong smell of white vinegar, you can substitute it with an equal amount of fresh lemon juice or a tablespoon of citric acid powder mixed with water. The natural citric acid breaks down limescale just as effectively and leaves a fresh scent behind.
Is it safe to put the bottle warmer in the dishwasher?
Absolutely not. The main body of a bottle warmer contains electrical wiring and a motor. Submerging it in water or placing it in a dishwasher will permanently destroy the machine and create a massive electrocution hazard. Only removable, non-electric plastic inserts can be washed in the sink.
Why does my bottle warmer still smell like vinegar after cleaning?
Vinegar has a very pungent odor that can linger on plastic. To neutralize the smell, simply fill the warmer with fresh water, run one standard heating cycle, and then dump the water out. Leave the lid open, and the smell will dissipate completely within a few hours.
Can limescale make my baby sick?
The calcium and magnesium that make up limescale are not directly toxic to humans. However, the rough, crusty surface of limescale is the perfect hiding spot for harmful bacteria and mold to grow, which can transfer to the outside of your baby’s bottle and make them sick. Keeping it clean is vital for hygiene.
Is Your Warmer Beyond Saving?
If the heating plate is permanently scorched or the motor is failing due to years of hard water damage, it might be time for a fresh start. We have rigorously tested the market to find the most durable, easy-to-clean devices that resist mineral buildup and make 2:00 AM feedings effortless.